Feeds:
Posts
Comments

Archive for the ‘Italian Style’ Category

Salt has been used as a method of preserving fish for centuries, prolonging its life and thus ensuring a ready supply.  It is widely used in warmer countries where it would otherwise deteriorate very quickly.  Nowadays fish is more commonly preserved by freezing, but the traditional dry salt method is still popular for the distinctive flavour it gives.  Salted fish is not commonly used in traditional British cooking but is widely used across the world, especially in the Mediterranean, Scandinavia and the Caribbean so it is readily available in ethnic food shops, plus it can now often be found in the ethnic aisles of large supermarkets.  I regularly buy blocks of salted skinned boneless pollack for using in recipes such as Hyacinth’s Salt Fish Cakes from the Caribbean or Spanish/Basque Style Salt Cod (Bacalao) in Spicy Tomato Sauce.  Providing it is thoroughly soaked (overnight) and rinsed in two or three changes of water I find this purchased ready salted fish easy to use.  Providing the expiry date on the pack is observed, it does not need refrigeration.  (It can eventually be frozen too if it looks as if it might go out of date before use.)

When my mother in law gave me her copy of Taste of the Sea by Rick Stein I was surprised to see just how easily fish, particularly white fish, can be salted at home.  I experimented with reasonable success with some thawed frozen skinless pollack fillets, just enough for one meal. The instructions are not clear on how salted fish should be kept for long term use, (the recipe suggested it could be stored for up to week but I was nervous about keeping it for that long) so I used the fish just two days into the salting process.  (I also assumed that it needed to be refrigerated until use, even though I store purchased fish in the cupboard.)  It was lightly cured and soft to the touch with a mildly salted flavour but did not have a dried texture (this might have happened with longer salting). This method of salting is simple, but I feel it is worth noting here that it should probably be called lightly salted fish. After some research I discovered a helpful article at Downhomelife  which started with a warning:

Proper salting is a lengthy, fairly complicated process and special equipment or controlled conditions are needed to dry the fish thoroughly and safely.

Which is worth bearing in mind, though these words have now been removed from the article.  However the warning is about drying the fish to avoid poor results.  On the plus side the site also mentions the simple shortened method I had tried:

…the fish is cured in salt in what’s called a “pound” – a square bin where you let the fish soak in salt for about 21 days. If you want a less salty version called “shore fish,” you lightly sprinkle the fish with salt and let it cure for only a couple days.

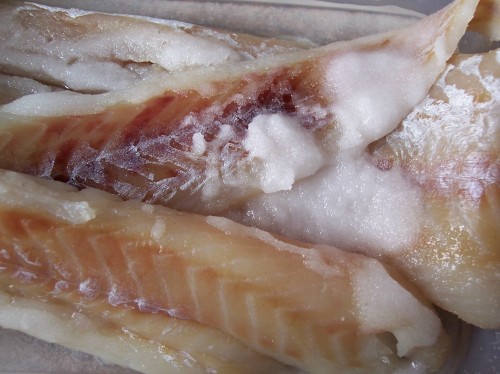
I would certainly not re-freeze fish salted by this method as I am not sure enough that this can be done safely.   If salting fresh fish, rather than frozen, it could be frozen once salted.  Below is my version of salted fish.  My picture was taken 24hrs after salting.  In the end I consider this a simple way of lightly salting fish, providing the process takes place two days ahead of the date the fish is required.   It is a method I would be happy to use again, especially as I prefer the milder flavour, but I will probably also continue to buy the blocks of salted fish as they are so convenient.  Other useful links are this overview of  Salt fish giving a helpful list of types and names around the world, this article at ehow with a similar method to that given by Rick Stein and this enlightening Ezine Article.  I would be interested to hear from any readers who have successfully tried salting fish at home by the Rick Stein method, or similar.

If you have not smelled salt fish then you would be advised to do so before you make your own to give a guideline.  Salt fish has a different, much stronger, aroma from fresh fish but if really unpleasant then discard the fish and do not take the risk. Often purchased salt fish smells particularly strong but we have never suffered ill effects.   
'Meanderings through my Cookbook' http://www.hopeeternalcookbook.wordpress.com

Salted Fish

Fillets of White Fish (Cod, Haddock, Pollack, Coley or similar)
Salt (Type not specified in the original – I used Rock Salt)
A large plastic container big enough to hold the fish without overlapping

1.  If using frozen fish then it should be thoroughly defrosted before salting and should not be re-frozen.

2.  Pat the fish fillets dry with kitchen paper and put them in the plastic container in a single layer without overlapping.

3.  Completely cover the fish with a thick layer of salt.

4.  Put a cover on the container and refrigerate for 24hours.

5.  After 24hours most of the salt will have turned to brine with the water drawn out of the fish.

6.  This fish will now be sufficiently preserved to keep for up to a week in the refrigerator.  The recipe does not say what to do with the brine but I poured away the excess liquid, leaving the patches of undissolved salt to continue the process.

—–

To prepare salt fish for cooking it should be soaked in plenty of cold water.  If it is lightly salted this will take just an hour or two but fish that is more dried out should be soaked for up to 24hours. I usually give it a second quick rinse in cold water before use.

Read Full Post »

Following on from my original post about Pizza Bases last year, here is a good idea for a speedy pizza and one I will be using regularly.  It substitutes ready bought pitta breads as pizza bases.  The original recipe suggested that the pittas could be divided in two for an extra crispy pizza, layering toppings on rough side.  I found this proved too difficult.  I ended up with two halves of different thicknesses, one of which was far too thin.  An uncut pitta is perfectly adequate as a base.   The suggestion was that round pittas could be used if available, but I could not track any down: oval was fine.  Some supermarkets sell very small pitta breads which would be idea served at a buffet.

The original recipe came from Red magazine, August 2008 issue, in an article giving suggestions for picnic food.  It is ideal as a light snack, either cold as they suggest, or hot straight from the oven with salad for a summer light meal.  I used a simple mozzarella and tomato topping, adding slices of mushroom and red pepper, but any other favourite toppings could be used: fresh tomato, ham, tuna, prawns are all popular.  The original recipe first spread on a layer of tomato puree but I used my home made Tomato Relish – recipe to follow very soon.

'Meanderings through my Cookbook' http://www.hopeeternalcookbook.wordpress.com

Pitta Pizzas
(Makes 6)

Olive oil, a little to brush over and to pour on top of each pitta pizza
6 pitta breads, white or brown
½tsp Tomato puree, evenly smeared, per pitta
   or
2tsp Tomato Relish (or similar) per pitta
Two pinches of Italian mixed herbs/pizza herbs per pizza
2 x 125g Mozzarella Balls cut into thin slices
Black pepper
Torn fresh Basil leaves
Slices of Mushroom, 2-4 per pitta pizza (optional)
Thin slices of Red Pepper, about 2 per pitta pizza (optional)

1.  Pre-heat the oven to 180oC/350oF/Gas 4.

2.  Place the breads on a baking tray and smear lightly with a little olive oil, going right to the edges.

3.  Smear on a layer of tomato puree (do not go right to the edge as it will blacken if not covered).  Alternatively spread on tomato relish.  Sprinkle lightly with Italian or pizza herbs.

4.  If using mushroom, red pepper or other ingredients equally divide these between the bases.

5.  Drain the cheese well and blot with some kitchen towel to remove excess moisture.  Cut into thin slices.

6.  Sprinkle lightly with more Italian or pizza herbs and a little black pepper.

7.  Drizzle with olive oil.

8.  Bake in the oven for 10mins and serve with salad

Alternative toppings:

Potato, Fontina & fresh Thyme
120g waxy new potato, cooked & sliced
80g fontina or taleggio cheese, thinly sliced
1tbsp fresh thyme leaves
Sea salt

Onion Chutney, Goat’s Cheese & Rosemary
2tbsp onion chutney
80g goat’s cheese, crumbled
1tbsp freshly chopped fresh rosemary leaves
Sea salt

Read Full Post »

Lasagne al Forno, which I make with my own version of Ragu Bolognaise, has developed over the years. The combination of minced beef with a small amount of diced bacon in a rich sauce, layered with sheets of Lasagne pasta, is one of my daughter’s favourites and regularly turns up as the main course on her birthday. It is worth making a double quantity of this Lasagne.  A second lasagne can be frozen for later use.  (Do this in a foil lined dish.  The dish can be taken from the freezer when the lasagne is frozen leaving just the foil enclosed Lasagne. The foil should be removed from the frozen lasagne before it is placed back in the original dish for defrosting.  Allow to thaw fully before cooking for 45minutes to 1hr as in the original instructions.)

This method for Lasagne al Forno is my own tried and trusted recipe, not taken from any particular book but adapted down the years as I have discovered new ‘twists’ that work well. I expect it will continue to develop, so this page may occasionally be updated.

100_4176 Lasagne al forno

'Meanderings through my Cookbook' http://www.hopeeternalcookbook.wordpress.com

Lasagne al Forno
(Serves 6)

1 quantity of Ragu Bolognaise (see basic recipe)

200g dried lasagne sheets: about 8/9 sheets, more if you wish (use home made pasta if available)
30ml/2tbsp cornflour
500ml/1pt milk
5g/1 knob butter
5ml/1tsp grated nutmeg
Salt & pepper
25g/1oz Parmesan cheese (or cheddar if unavailable) – more if you wish
1 or 2 tomatoes to slice for decoration
15ml/1 tbsp chopped fresh parsley (omit if unavailable)

1.  Follow the instructions for the Ragu Bolognaise

2.  Mix the cornflour to a paste in a saucepan with a little milk and then gradually stir in about ¾ of the remaining milk.  Gently heat, stirring continuously until the sauce thickens.  This can also be done in a jug in the microwave oven, stirring well in between short bursts of heat.  Stir in the nutmeg and season to taste with salt & pepper.

3.  Using an oblong dish first put in a layer of meat mixture, followed by a drizzle of white sauce (2 or 3 tablespoons) and cover with 2 or 3 lasagne sheets, depending on the size of the dish.  Continue adding layers finishing with meat.  Rinse the pan the meat sauce has been cooked in with a little water and gently add these juices around the edges of  the dish.  It is important to have plenty of liquid in the dish as this helps the dried lasagne sheets to cook thoroughly and will evaporate during cooking time so just a thick sauce is left.  Finally finish with a layer of the remaining white sauce, covering as evenly as possible. 

4.  Sprinkle well with parmesan cheese and slices of tomato to decorate.  Bake at 200oC (190oc Fan oven)/400oF/Gas 4 for 45mins to 1hr.  Scatter with chopped parsley to garnish.

5.  Serve with salad or a green vegetable and hot garlic bread.

Read Full Post »

The most well known Ragu takes its name from the Italian town of Bologna.  This rich sauce can be served on a bed of cooked pasta: spaghetti, tagliatelle or one of the many shapes.  It can also be cooked as part of the layered pasta dish Lasagne al Forno (literally lasagne cooked in the oven) or spooned as a filling into canelloni: tube shaped pasta.  Pasta is available dried or fresh in the supermarket, but if possible use home made.  Delicious!

This version is my own which has developed over the years as I have discovered ‘improvements’ in recipe books, from dining out and from TV cooks.  I use minced beef (some people prefer diced beef).  Once, having eaten a delicious version in a restaurant who included diced bacon, this has become a regular addition.  I cannot remember where I first heard about starting the recipe by frying the onion, carrot and celery mixture together, but it adds a wonderful flavour.  The Italian word for this ‘trinity’ of vegetables, when it is fried in a small amount of oil, is soffritto: in French the same mixture is called mirepoix.  Heston Blumenthal, the experimental chef, used soffritto when he made Ragu, but added a crushed star anise, more commonly used in Oriental cuisine, as it is a flavour enhancer.  I was not sure about all the additions he made to the dish – there seemed rather too many complex flavours – but the star anise sounded worth trying, though I have yet to sample it. Food writer Sue Kreitzman, always wanting to make dishes a bit healthier by reducing the red meat content per head, suggests the addition of finely diced aubergine, which cooks down to become invisible.  This is a good tip if you are trying to make your meat go a bit further too. The addition of red wine gives an extra special richness to the ragu, but you can leave it out, especially if you are feeding those who do not want the alcohol – even though, of course, the alcohol content will be long gone just leaving the richness of flavour. I always add wine if I have some to hand. Part bottles of wine that have been left over after a dinner can be frozen in plastic containers: it is perfect for adding to recipes, as long as the food will be cooked. The alcohol content means that the wine will not solidify completely and the frozen mush can be conveniently spooned out and used as and when required.

Ragu Bolognaise
(Serves 6)

1 large carrot, finely diced
1 large onion, finely diced
1 stick celery, finely diced
2 cloves garlic, minced or crushed
125g/4ozs diced bacon, smoked or unsmoked
1 small crushed star anise (optional and untried!)
125g/4ozs button mushrooms, quartered (or larger ones, sliced)
1 medium Aubergine, diced (optional)
15ml/1tbsp Italian herbs
500g/1lb minced beef steak
30ml/2tbsp tomato purée
1 x 400g tin tomatoes, chopped
1 red pepper
1 green pepper
1 small wineglass of red wine (about 125ml/¼pt)
15ml/1tbsp olive oil

1.  If using Aubergine it is usual to sprinkle it with salt, place it in a colander, cover it with a plate and place a weight on top of it for at least 30minutes, to let the juices can run out.  You can cut out this step if you are short of time: I have never noticed much difference in taste.

2.  Cook the finely chopped carrot, onion and celery mixture in olive oil until it is softened.  Add the crushed garlic, the bacon with the crushed star anise (if using) and continue to cook for a further 5 minutes. Drain and rinse the aubergine (if using) and stir in with the chopped mushrooms and herbs. Cover the pan and continue to cook for a further 5 minutes.

3.  Stir in the minced beef  and cook slowing, turning from time to time, until it is brown.  Mix in the tomato purée.  Chop and stir in the tin of tomatoes.  Cut the peppers into small dice and stir into the mixture.  Stir in the red wine.  Cover the pan and simmer the mixture for at least 30 minutes longer, but more if possible especially if it is being served as a sauce rather than being made into a dish that will be given extra cooking time when baked in the oven.  It is quite common to cook the meat mixture for several hours during which time it the flavours develop as the sauce reduces.  I think that 1hour cooking time is the minimum required for a good and tasty sauce.

Read Full Post »

This is a very simple and creamy risotto and the cooked cucumber is a revelation! The recipe breaks the normal rules of risotto making as you can add all the liquid together rather than the usual rule of adding it gradually.  If you want an extra special dish then you could use Carnaroli rice, but I think Arborio is fine.  I have cooked cucumber before, but a long time ago. I seem to remember it made a delicious sauce that went with fish, though I cannot remember either the type of fish or the location of the recipe. You could mistakenly think that courgette could be substituted, but cooked cucumber is nothing like it.  It could be used as an alternative, but courgette would make this a completely different dish.

The original recipe adapted from a book I found in the library, Cooking with Salmon, the King of Fish by Jane Bamforth. I had some fennel in the fridge, always a good partner with fish, so I decided to add this. As the fish is diced for the recipe use fresh salmon offcuts if available.  The original recipe suggested just using the white parts of the spring onions, but I could not see why the green tops could not be used as well! The seasoning needs to be checked carefully otherwise the risotto could be rather bland. Next time I make this – and I am sure I will – I will replace the tarragon with lemon juice and zest, which I think will add a lovely tang.

100_5729 Salmon Risotto with Cucumber & Fennel

'Meanderings through my Cookbook' http://www.hopeeternalcookbook.wordpress.com

Salmon Risotto with Cucumber & Fennel
(Serves 4)

25g/1oz butter
1 bunch of spring onions, cleaned and chopped
1 fennel bulb, cleaned and chopped
1 small cucumber (more if you wish)
350g/12ozs Arborio risotto rice
1.5litres/2pints fish or vegetable stock
150ml/¼pint dry white wine
1lb salmon fillet pieces (offcuts are fine) skinned and diced
45ml/3tbsp chopped fresh tarragon
Salt & ground black pepper

1. Melt the butter in a pan and gently fry the onion, fennel and cucumber for about 2 minutes without browning the vegetables.

2. Stir in the rice and pour in the stock and wine. Bring to the boil and then simmer uncovered for 10minutes. Stir occasionally.

3. Stir in the diced salmon and season. Continue cooking for another 5 minutes. Switch off the heat, put lid on the pan and leave the risotto to stand for another 5 minutes.

4. Uncover the pan and stir in the tarragon. Serve in bowls. Add crusty bread if you wish.

Read Full Post »

This speedy Italian style salad can be put together in minutes using tinned tuna and, for speed, tinned beans. I used black-eye beans but haricot or cannellini beans could be substituted.  A good mayonnaise, home made if available, could be used as an alternative to the olive oil and lemon juice dressing but the beans should be cold before it is stirred through. Tuna and Bean Salad can be served as part of a meal with a green leaf salad, cucumber and tomato along with crusty granary or white bread and butter.  I used it as a jacket potato filler, which was very successful.  It could also be served as a simple starter on a bed of shredded lettuce.  If you are using tuna in brine you may need very little, if any, salt.

The original recipe comes from The St Michael All-colour Cookery Book by Jeni Wright.  I have adjusted some of the proportions given in the book. 

100_4743 Tuna & bean salad

'Meanderings through my Cookbook' http://www.hopeeternalcookbook.wordpress.com

Tuna & Bean Salad
(Serves 4)

Dressing (proportions may be increased if you wish)
3-4tbsp olive oil (may need less if tuna is in oil)
1-2tbsp lemon juice
2-3tbsp freshly chopped parsley
Black pepper

Salad ingredients
6ozs/175g beans (I used black-eye) or a 15oz/400g tin, drained & rinsed
1 small spring onion (both white & green parts), finely sliced
60z/185g tin flaked tuna (or nearest size equivalent), drained
salt (may not be needed if tuna is in brine)

1.  Cook beans, if not using a tin, by covering with water, bringing to the boil and boiling for 10minutes.  This is important to remove the toxins that can be found in black-eye beans (and also red kidney beans).  Continue to cook for a further 30minutes or until soft but before they begin to break up.  Alternatively, drain and rinse the tinned beans.  If possible, warm tinned beans gently as this will help them take up the flavours of the dressing. 

2.  Mix the chopped spring onion with the warm beans and add the olive oil and lemon dressing.  Once cold, stir through the flaked tuna and adjust seasonings. 

3. Stir the chopped parsley through the mixture before serving.

Read Full Post »

This pizza topping uses both smoked and fresh salmon, which combines beautifully with the creaminess of the avocado augmented by a few spoonfuls of crème fraîche.  It is very simple to put together, especially if you have some ready made tomato topping in the freezer and, if you are short of time, use the quick to make scone base.  As previously, I substituted a chopped cornichon gherkin for capers, the very small quantity of tart vinegary taste successfully cut through the richness of the other ingredients: I must remember to buy some capers!  If you do not have chives, you can use the green leaves from a spring onion, finely cut.  I left out the wine suggested in the original recipe as I did not have any to hand and do not think it was missed.

This recipe, originally titled Salmon & Avocado Pizza , was adapted from a book I found in the library, Cooking with Salmon, the King of Fish by Jane Bamforth.  (I felt it was helpful to note the use of both fresh & smoked salmon, hence the title change.) There are more very tasty looking ideas in this book and I hope to be able to try others before I return it.  I have posted the recipes for the Pizza base and tomato sauce already. 

100_4347 Double Salmon & Avocado Pizza

'Meanderings through my Cookbook' http://www.hopeeternalcookbook.wordpress.com

Double Salmon & Avocado Pizza (on Scone Base)
(Serves 3-4)

1 quantity of pizza base using basic recipe – I used Scone (biscuit) base
⅓ quantity of Tomato Sauce using basic recipe

Topping
150g/50z salmon fillet or pieces
120ml/4fl ozs dry white wine or water
115g/4ozs grated mozzarella cheese
1 small avocado, halved, stoned (pitted), peeled and cubed
10ml/2tsp lemon juice
30ml/2tbsp low fat crème fraîche or sour cream
75g/3ozs smoked salmon, cut into pieces (use offcuts – from supermarket ’Value’ range)
15ml/1tbsp drained bottled capers or 1 small cornichon gherkin, finely chopped
30ml/2tbsp chopped fresh chives
1tbsp olive oil

1.  Roll or press out the dough making a 25cm/10inch circle directly onto your greased pizza pan.  Push up the edge a little with your fingers to make a rim.

2.  Pre-heat oven to 200oC (190oc Fan oven)/400oF/Gas 4

3. Place the salmon in apan and cover with water (or use wine as in the original recipe).   Bring to the boil, take  off the heat, cover and leave to cool.  The fish will continue to cook while cooling.  (Reserve the liquid as stock.  Can be frozen for future use.)  Flake the fish carefully removing the bones. 

4.  Spread the tomato sauce evenly over the pizza base going almost to the edge but keeping within the rim you have made. Sprinkle over half of the mozzarella and bake in the oven for 10minutes.

5.  Chop the avocado and toss in the lemon juice to prevent it from going black.

6.  Spoon the crème fraîche over the pizza followed by the two types of salmon, avocado, capers/chopped cornichon and the remaining mozzarella. Season with black pepper and drizzle with olive oil.

7.  Bake for a further 10 minutes until the pizza is crisp and golden brown.

8.  Sprinkle over the chives and serve immediately with a simple green salad.

Read Full Post »

Ever since I removed this recipe from a magazine it has proved to be one of our most popular family pasta dishes. I have lost count of the number of times I have made it, or variations of it, including on holiday last year in France. It is truly quick and easy – as the family know, my motto for holiday cooking is, in theory: ‘If I cannot get food on the table within 30minutes (less if possible) I am not interested’!

The original recipe from chef Jamie Oliver was published on a 2008 Sainsbury’s ‘Feed your family for a fiver’ (ie. £5) free instore recipe card and in various magazines alongside shop advertising. The basic recipe was pasta, bacon, garlic, crème fraîche, courgettes and cheddar cheese, which tastes good, but I have varied it a little in the ensuing months. In the version below I have included items I add regularly, especially as we like a few more vegetables – and somehow it just cries out for the grated Parmesan cheese topping.  Some supermarkets sell packs of mixed bacon pieces which are fine to use for this dish and economical too.

Rather than spoil a whole meal as I once did, be warned that occasionally courgettes are bitter and it is best to try a small piece of each one before adding to a recipe. 

Variation – see below:  
Creamy Pasta with Bacon & Butternut Squash

'Meanderings through my Cookbook' http://www.hopeeternalcookbook.wordpress.com

Creamy Pasta with Bacon & Courgettes
(Serves 4)

400g Penne or similar sized pasta shapes
250g  Ham/Gammon or streaky bacon (preferably smoked)
2 medium sized courgettes
200ml low fat crème fraîche
1 or 2 cloves of garlic, fine chopped or crushed
40g mature cheddar cheese (or Mozarella)
1 medium white onion (as well as or in place of garlic – optional)
1tbsp olive oil (if using onion)
100g button mushrooms, quartered (optional)
1 medium red pepper, in small chunks (optional)
20g finely grated Parmesan cheese, I use Grana Padano (optional)

1.  Cook the onion, garlic, bacon and mushroom (if using) gently in the olive oil for about 10 minutes, until the onion is transparent and the bacon/ham cooked through.  If you are not using the onion then omit the olive oil.

2.  Meanwhile, put cook the pasta in lightly salted boiling water, stirring occasionally and adding a small dash of oil to stop it from sticking together. 

3.  Slice each courgette lengthways into four pieces and the chop into ½”/1cm lengths.  De-seed and dice the pepper (if using).

4.  Stir into the bacon mixture and cook for no more than 10 minutes until the courgette is soft.

5.  Drain the pasta and stir through the bacon & courgette mixture.

6.  Gently stir in the crème fraîche and heat through very gently making sure it does not boil as it will split.

7.  Grate the Cheddar cheese and stir through the mixture just before serving but do not cook over the heat or it will spoil.  Alternatively sprinkle the Cheddar over the top if not using Parmesan.

8.  Serve in bowls with a sprinkling of Parmesan (or the Cheddar)

'Meanderings through my Cookbook' http://www.hopeeternalcookbook.wordpress.com

Creamy Pasta with Bacon & Butternut Squash 
Exchange the courgette for butternut squash, peeled, deseeded and diced.  I also added quartered button mushrooms and a red pepper cut into strips.  Otherwise the method is the same as above. 
My family have started to request this in preference to the original!

Read Full Post »

This is such a handy and simple recipe which can be put together in as long as it takes for the sausages and pasta to cook – shorter if you have some leftover pre-cooked sausages available. Choose a good quality sausage – pork and leek or pork and herb are both good choices.  The courgette ribbons are a pretty touch and are so thin that they cook through in a matter of minutes. They are quite fiddly to make – I used a potato peeler. If you choose to cut the courgette in another way then make sure you cut them equally as thinly, or cook for a little longer.

Rather than spoil a whole meal as I once did, be warned that occasionally courgettes are bitter and it is best to try a small piece of each one before adding to a recipe.

The original recipe was on a free instore card found at Sainsbury‘s supermarket in January 2009.  I have added an onion and Parmesan, but both are optional.

100_4026 Sausage & Courgette Pasta

'Meanderings through my Cookbook' http://www.hopeeternalcookbook.wordpress.com

Sausage & Courgette Pasta
(Serves 4)

8 good quality thick pork sausages
1 clove garlic, crushed/finely chopped
1 finely chopped onion (optional)
1tbsp olive oil (if using onion)
1 x 400g tin of plum tomatoes, chopped (I do this in the tin using scissors/knife)
½tsp sugar
2 courgettes, washed and cut into fine ribbons
12ozs/375g penne pasta
Thyme, to taste
Salt & pepper
Parmesan, grated (to taste – optional)

1.  Unless pre-cooked sausages are available, grill them until lightly browned and set aside. 

2.  If using onion, cook with the garlic in olive oil over a low heat until translucent but not browned.

3.  Cook the pasta in boiling salted water for 10-12minutes.

4.  Place the chopped tomatoes, garlic (if not already used), chopped sausages and thyme to taste in a pan.  Cook over a low heat for 10-15minutes.

4.  Drain the pasta and stir into the tomato mixture along with the courgette ribbons.  Season as necessary.  Cook for about 5mins but do not overcook the courgette.

5.  Serve in bowls with grated parmesan and crusty bread, if wished.

Read Full Post »

With its sprinkling of crunchy toasted almonds and hint of nutmeg this vegetarian pizza is just a bit special and would make a lovely lunch dish to enjoy with a vegetarian friend.  I like the combination of spinach with cheese (usually in a sauce) that makes any dish ‘Florentine’ style (from Florence in Italy), especially if combined with egg. Our local pizza takeaway produces a ‘Florentine Pizza’ I have always liked and which has just one raw egg cracked on top. This started me thinking and therefore the major change I have made to this recipe is, rather than using slices of hard boiled egg which I felt could get over dry and possibly even burn, to break raw eggs into wells I had made with the back of a spoon in the spinach. The eggs cooked through easily in the cooking time and none had runny centres.

Non-vegetarian alternatives: For die-hard meat lovers there is no reason why you could not add some diced bacon, or even serve it with a rasher or two, which would be good  served as brunch.  Another idea to try would be to top the pizza with some uncooked flaked smoked haddock, another well known ‘Florentine’ combination.

The basic idea I have adapted for this recipe comes from Step-by-step Pizzas by Wendy Lee, a great book with everything you need to know including making basic pizza bases and preparing the Tomato Sauce topping plus a large number of different pizza recipes.

100_4059 Pizza Florentine

'Meanderings through my Cookbook' http://www.hopeeternalcookbook.wordpress.com

Pizza Florentine
(Serves 2-4)

1 quantity of pizza base using basic recipe – I used Potato base
⅓ quantity of Tomato Sauce using basic recipe
2ozs Parmesan cheese, grated
175g/6ozs fresh Spinach leaves
1 small red onion
2tbsp olive oil
¼- ½tsp freshly grated nutmeg
15g/½oz fresh white breadcrumbs
60g/2ozs Emmental cheese (or Jarlsberg/Gruyere/Mozzarella/Cheddar)
2tbsp flaked (slivered) almonds
olive oil for drizzling
2-4 eggs (one egg per person)
Salt & Pepper

1.  Mix the Parmesan cheese with the potato mixture, if you are making a potato base pizza.

2.  Roll or press out the dough making a 25cm/10inch circle directly onto your greased pizza pan.  Push up the edge a little with your fingers to make a rim.

3.  Pre-heat oven to 200oC (190oc Fan oven)/400oF/Gas 4

4.  Remove the stalks from the spinach and wash thoroughly shaking off as much water as possible.

5.  Fry onion gently in the olive oil for 5minutes until softened.  Add the spinach and fry briefly until just wilted.  Drain off any excess liquid produced.

4. Spread the tomato sauce evenly over the pizza base going almost to the edge but keeping within the rim you have made.  Cover with a layer of onion and spinach mixture and then evenly sprinkle over the nutmeg.

5. Make a slight indentation in the spinach topping for each egg, making sure that they are evenly spaced.  Be careful not to push through the pizza base.  Gently break an egg into each indent.

6. Evenly sprinkle over breadcrumbs, cheese and slivered almonds. Drizzle with a little olive oil and season.

6. Bake in the pre-heated oven for 18-20minutes until the edge of the pizza is crisp and golden.

7. Transfer to a warmed serving plate. Serve immediately with salad.

Read Full Post »

Older Posts »