Feeds:
Posts
Comments

Archive for the ‘Spanish Style’ Category

Here in the UK, rice pudding has long been associated with nursery food (blame the Victorians, perhaps), school dinners or, at best, comfort food for the Winter.  When slowly baked in the oven the milk reduces, the rice becomes thick and a brown skin forms on the top.  The flavouring, apart from sugar, comes from a sprinkling of nutmeg and sometimes (rather unusually) a bay leaf.  Safe, but unexciting – and to some people a complete turn off.  Spanish rice pudding, however, is something entirely different and it would be so easy for the uninitiated to miss out on a treat.  Spaniards appear to have a very sweet tooth and love their creamy desserts.  The sweet vanilla custards crema catalana (a version of the French crème brûlée) and flan (similar to crème caramel) are both very popular, as is this very un-British rice pudding.  Flavoured with vanilla, coconut, cinnamon, lemon and orange rind it is served chilled and is a popular sweetener at the end of the meal in restaurants and tapas bars.  This is not a dish for a winter day (or the nursery) but ideal to finish off a summery meal.  My family’s verdict was that this was really delicious so I shall certainly be making it again, especially as it was so easy.  I would definitely serve it as part of a Spanish themed meal, possibly with some fresh fruit.  Caramel oranges would be ideal and in keeping with the Spanish theme.  A Spanish biscuit or small churro as an extra would be a good addition in place of some of the suggested serving toppings.

My starting point for this recipe was a combination of two found online.  The first – my main source – was from The Times Online: Cinnamon Rice Pudding with a few ideas from the Canadian site Lululuathome, although I did not add either the egg or condensed milk suggested in this second recipe.  The first time I used part milk and part coconut milk made from 25g dessicated coconut soaked in 250ml boiling water.  A better alternative, which avoids having to discard the coconut, is to use all milk and add 1oz/25g coconut powder.  Another alternative would be to use a can of coconut milk, which is available in a low fat version, topped up with milk.  I took my quantities from the Times recipe, which is supposed to serve 4-6 but this would give very small portions: I prefer to think of it as for 3-4 people, even though it is rich.  If it was cooked for slightly less time the portions would be larger but a little more runny.

'Meanderings through my Cookbook' http://www.hopeeternalcookbook.wordpress.com

Arroz con Leche
Spanish Style Rice Pudding
(Serves 3-4)

1¾ pints/1 litre milk (whole or half fat)
1 small/medium cinnamon stick
3 whole cloves or a tiny pinch of ground cloves (optional)
Zest strips peeled from a lemon
Zest strips peeled from an orange (plus a few thin zest strips – see below)
4ozs/125g 
short-grain rice (Spanish Calasparra or UK Pudding Rice)
3ozs/100g caster sugar (could reduce a little)
1 tsp vanilla extract
½ tsp ground cinnamon to serve
A few thin orange zest strips to serve (optional)
A little dessicated coconut (optional)

1.  Remove the zest from the fruit with a potato peeler, making sure no white pith is included.  Put the milk, cinnamon stick and clove (if using) in a saucepan along with the lemon and orange zests.  Bring to the boil then take off the heat and put to one side.

2.  Leave for the flavours to infuse for 30 minutes. Strain and throw away the rinds and cinnamon stick.

3.  Return the milk and heat through in the saucepan.  Bring to a simmer and then add the rice.

4.  Cook on a low to medium heat.  Stir the rice and milk regularly for 10 minutes so it does not start to stick or burn.  Add the sugar and vanilla extract.  Continue to cook, stirring regularly for a further 10 minutes.

5.  When the rice mixture has thickened and the grains are cooked (they should be soft when squeezed between a thumb and finger) remove from the heat.

6.  Allow the rice mixture to cool and then chill in the  fridge.

7.  Serve chilled in small dishes dusted with cinnamon and a few strips of orange zest and/or dessicated coconut.

Read Full Post »

Since I don’t speak Spanish (I learned French and a little German at school) I ran the words Patatas Bravas through the online translator, just out of interest.  I was surprised to find it simply means roast potatoes: but as they are roast potatoes with a Spanish twist they are unlike any roast potato I have eaten before.  Most of the recipes I found were actually for pan fried crispy potatoes rather than roasties but I am sure this could be made with traditionally oven roasted potatoes too so I have included this in the instructions.  The Spanish twist is, of course, the tangy and spicy tomato sauce which is served on top or on the side.

The recipe below is my combination of ideas from several sources.  One starting point was my book of Tapas and Paella recipes: Spanish Bar and Restaurant Cooking by María Solís Ballinger & Natalía Solís Ballinger, but I also consulted the Patatas Bravas recipes of James Martin, Simon Rimmer, BBC Good Food, Guardian online, Jason Atherton in NatWest Customer magazine (New Year 2011) and the website debskitchencreations.  In most cases the sauce is based on a tin of plum tomatoes, but it can also be made using tomato ketchup (a suggestion from the book mentioned above), especially if it is home made Tomato Ketchup, something I do make from time to time.  Smoked Paprika is essential as a spicy flavour of Spain, but the recipes also variously include hot pepper from chopped chilli peppers, chilli powder, Cayenne pepper or Tabasco Sauce.  There were huge variations in the quantities used and thus the amount of heat, but I am sure this should be according to personal taste.  Herbs were added too: most usually thyme but one recipe used a bay leaf and parsley as a garnish.  Lemon added piquancy in one recipe and in another a little sugar, something I often add to tomatoes anyway, gave additional sweetness.  Yet another added tomato purée.  Jason Atherton added a chopped red pepper, always a popular ingredient in our house, after the style of the city of Burgos.  The sauce should be spooned over the Patatas Bravas at the last minute so they reach the table crispy rather than soggy.  Some recipes also serve Mayonnaise, or the wonderfully garlicky mayonnaise based Aïoli sauce on the side.  (This is the mostly used French spelling from Provence: the Catalan spelling is Allioli.)  In the book mentioned above mayonnaise is mixed with the tomato sauce, but I prefer them separately.  The dish is common in Tapas bars throughout Spain, with the pieces of potato often on cocktail sticks.  It would make an excellent dish at a buffet table or as a starter though it is delicious served at a main meal with fish (or simply grilled meat).

'Meanderings through my Cookbook' http://www.hopeeternalcookbook.wordpress.com

Patatas Bravas
Roast Potatoes Spanish Style
(Serves 4-6)

4-6 large potatoes (one for each diner)
Olive oil for frying
Salt
For the sauce
1 large onion
2/3 cloves garlic
olive oil
1 large red pepper
Pinch cayenne pepper (more if you like it hotter)
1tbsp smoked paprika
1tbsp tomato purée
1tbsp fresh thyme or ½tbsp dried thyme
1 small bay leaf (optional or as an alternative to the thyme)
1tsp lemon juice
1tbsp sherry (or wine) vinegar (optional)
½tsp sugar
Salt & black pepper
Chopped parsley to garnish

1.  Finely chop the onion and crush the garlic cloves.  Gently fry in olive oil, covering the pan, until transparent but not browned.  Finely chop the red pepper, stir in and continue to cook until soft.

2.  Chop or liquidise the tin of tomatoes.  Add the spices, thyme, bay leaf (if using) and tomato purée to the onion mixture and stir.  Mix in the chopped/liquidised tomatoes, along with the lemon juice, vinegar (if using) and sugar.  Bring to boil, then reduce the heat and cook gently without a lid until reduced to a thick slightly chunky sauce.  Remove the bay leaf.

3.  Taste and adjust seasoning, adding salt and black pepper as needed.

4.  While the sauce is reducing peel and cut the potatoes into one inch/2.5cm chunks.  Place in a pan, cover with boiling salted water and bring to the boil.  Cook for 5 minutes and no longer.  Drain the potatoes and blot so they dry slightly.

5.  The potatoes can be either pan fried or oven baked.
To pan fry:  Put into a frying pan with olive oil and a sprinkling of salt.  Fry gently until browned, turning from time to time as they will stick a little.
To oven bake: Put into a baking tin with olive oil and salt and place in the oven.

6.   The potatoes should be served when golden and crispy.  Add the sauce just before serving along with mayonnaise or Aïoli and a sprinkling of chopped fresh parsley.

Read Full Post »

A few years ago we visited the Basque region which straddles the South Western French and Spanish borders but although we went into Spain we spent most of our time in France.  One French place we visited was Espelette, home of the famous pepper Piment d’Espelette (Espelette pepper), some of which I brought back from holiday.  I am always looking for ways to use some of this mild dried pepper mixture.  Not long ago I was directed to another post about Piment d’Espelette by London Eats, when it was used as an ingredient in a Spicy Mixed Bean Stew.  I now know I am not the only person (in London too) with a jar of this delicious pepper looking for suitable recipes!

Back in November I came across a quick and easy recipe called Spanish Gammon Hotpot from The Vicar’s Wife.  (Just a few weeks ago I re-posted her wonderful recipe for Whole Orange Cake.)  The word hotpot, however, is a bit too English for me and reminiscent of Lancashire Hotpot, which is something entirely different, so I have renamed it.  Amanda (the Vicar’s Wife) suggested that it was an adaptable recipe, so that is just what I did.  I am not a great fan of baked beans, though I admit they have their uses, instead using a chick peas plus some mushrooms and garlic. (Amanda suggests haricot or cannellini beans as alternatives.)  For the meat content I used a thick bacon steak, but it could just as well be diced bacon or the leftovers from a piece of gammon, or even chunks of lean belly pork, plus some Chorizo sausage added for extra Spanish authenticity.   As well as the smoked paprika I included a small amount of the piment d’Espelette for a little extra heat.  I liked the idea of adding olives – rather sadly I am the only person in our house who likes them – and had intended to do so, but forgot.  There will, however, be a next time.  The meal was served with crusty bread and green salad.  This speedy supper is definitely a meal for my ‘make in 30 minutes max’ category.

'Meanderings through my Cookbook' http://www.hopeeternalcookbook.wordpress.com

Spanish Style Gammon Stew
(Serves 4)

1tbsp olive oil
1 large onion, chopped
2 cloves garlic, finely chopped
1 green pepper, chopped
8ozs chopped bacon or leftover ham/gammon
25g/1oz piece chorizo sausage
50g/2ozs button mushrooms
1 x 400g tin tomatoes, slightly chopped
1 x 400g tin chick peas (originally baked beans)
½-1tsp piment d’Espelette or dried chilli to taste (optional)
1tsp smoked paprika
12-15 stoned halved black or green olives (optional)
Salt/black pepper to taste

1.  Gently fry the onion in the olive oil until soft and translucent.  Stir in the garlic and mushrooms.

2.   If using cooked meat reserve it until later, but uncooked bacon should be added now.  Mix in well and cook for 5 minutes.

3.  Add the chopped pepper, tomatoes and chick peas (or other beans) along with the piment d’espelette and smoked paprika.  Cover with a little water.

4.  Simmer for about 20 minutes until the peppers have softened.

5.  Serve with rice or crusty bread and a green salad.

Read Full Post »

The Basque Country in the western Pyrenees spans the border taking in part of South-west France and Northern Spain.  The coastal part of the region, on both sides of the border, is well known for its fish.  Bacalao, or Salt Cod, is a widely used ingredient in both Basque and Spanish cookery.  Salted fish is often associated with Lent, the six and a bit weeks from Ash Wednesday to Easter when, at the end of a long winter, fresh produce was at a premium.  I have recently added a post about how to salt fish at home, which is not a difficult process, however packs of ready salted fish is becoming more widely available in the UK.  I am fortunate to live in an ethnically diverse part of North-east London so usually shop for Salt fish in a local ethnic shop with mostly Caribbean produce, but the major supermarket chains are now starting to stock it too.  I usually buy salted skinless pollack, as it is a sustainable species – I am trying not to buy cod – and quite honestly I can barely tell the difference, especially when it is cooked into a stew.  This recipe, therefore, has been converted for pollack, but if you must then substitute cod – or another white round fish of your choice.

The recipe comes from a library book, The Spanish Kitchen by Pepita Aris.  As I have said previously I substituted ready Salted Pollack, soaked for twenty-four hours before use.  I am yet to try this recipe with home salted fish.  I was also a little unsure about adding the honey specified in the recipe.  Honey with fish?  It seemed  a bit strange!  However as I often add a little sugar to tomato based dishes as it cuts through the acidity I risked the honey and the flavour was not obvious.  The dish was certainly enjoyable.  I notice that there is a similar recipe from Central Spain in Keith Floyd’s book, Floyd on Spain, which includes chick peas.  I’ll have to give that a go sometime as well, perhaps using home salted fish.

'Meanderings through my Cookbook' http://www.hopeeternalcookbook.wordpress.com

Basque Style Salt Cod (Bacalao) in Spicy Tomato Sauce
Bacalao con Salsa de Tomate Picante
(Serves 4)

400g/15oz salt cod/salt fish, soaked in cold water for 24hours
(I used a 300g pack which was adequate with extra pepper)
30ml/2tbsp olive oil
1 large onion
2 cloves garlic
2 green peppers (or one each red or orange and green)
500g/1¼ lb peeled & chopped ripe tomatoes
or
400g/14oz tin tomatoes
15ml/1tbsp tomato purée
15ml/1tbsp clear honey
¼tsp dried thyme
½tsp cayenne pepper
or
½tsp Piment d’Espelette (coarse ground dried Basque pepper)
Juice of ½ lemon
2 potatoes (medium sized)
45ml/3tbsp stale breadcrumbs (be generous – I’m sure I doubled this amount)
30ml/2tbsp finely chopped fresh parsley
Salt & ground black pepper

1.   If using shop bought salt fish it should be soaked in cold water for 24 hours, drained and rinsed before use.  If home made lightly salted fish is used then an overnight soak followed by a rinse should be adequate.

2.   Drain the salted fish, place in a pan, generously cover with water and bring to the boil.  As soon as it boils remove the pan from the heat and set aside until cold.

3.   Heat the oil in a medium sized pan.  Gently fry the onion for 5 minutes and then add the garlic.  Add the chopped peppers and tomatoes and cook over a gentle heat to make a sauce.  Stir in the tomato purée, honey, dried thyme, espelette or cayenne pepper, black pepper and a little salt.  Taste and sea son as required.  Add alittle lemon juice to make it ‘tangier’.

4.   Peel and halve the potatoes lengthways and cut them into slices about the thickness of a coin.

5.   Drain the fish and reserve the cooking water.

6.   Turn on the grill to heat up.  Cook the potato slices for about 8 minutes, with no added salt, in the reserved water.

7.   Flake the fish and remove any skin and bones.

8.   Make up the dish in layers.  First put in a third of the sauce, cover with potato slices, followed by a layer of flaked fish and the finally the remainder of the sauce.

9.   Combine the breadcrumbs and parsley together and sprinkle over the dish.

10.  Place under the grill for 10 minutes until golden brown.

11.  This is a meal in itself but if you wish it could be served with a side salad.

Read Full Post »

Salt has been used as a method of preserving fish for centuries, prolonging its life and thus ensuring a ready supply.  It is widely used in warmer countries where it would otherwise deteriorate very quickly.  Nowadays fish is more commonly preserved by freezing, but the traditional dry salt method is still popular for the distinctive flavour it gives.  Salted fish is not commonly used in traditional British cooking but is widely used across the world, especially in the Mediterranean, Scandinavia and the Caribbean so it is readily available in ethnic food shops, plus it can now often be found in the ethnic aisles of large supermarkets.  I regularly buy blocks of salted skinned boneless pollack for using in recipes such as Hyacinth’s Salt Fish Cakes from the Caribbean or Spanish/Basque Style Salt Cod (Bacalao) in Spicy Tomato Sauce.  Providing it is thoroughly soaked (overnight) and rinsed in two or three changes of water I find this purchased ready salted fish easy to use.  Providing the expiry date on the pack is observed, it does not need refrigeration.  (It can eventually be frozen too if it looks as if it might go out of date before use.)

When my mother in law gave me her copy of Taste of the Sea by Rick Stein I was surprised to see just how easily fish, particularly white fish, can be salted at home.  I experimented with reasonable success with some thawed frozen skinless pollack fillets, just enough for one meal. The instructions are not clear on how salted fish should be kept for long term use, (the recipe suggested it could be stored for up to week but I was nervous about keeping it for that long) so I used the fish just two days into the salting process.  (I also assumed that it needed to be refrigerated until use, even though I store purchased fish in the cupboard.)  It was lightly cured and soft to the touch with a mildly salted flavour but did not have a dried texture (this might have happened with longer salting). This method of salting is simple, but I feel it is worth noting here that it should probably be called lightly salted fish. After some research I discovered a helpful article at Downhomelife  which started with a warning:

Proper salting is a lengthy, fairly complicated process and special equipment or controlled conditions are needed to dry the fish thoroughly and safely.

Which is worth bearing in mind, though these words have now been removed from the article.  However the warning is about drying the fish to avoid poor results.  On the plus side the site also mentions the simple shortened method I had tried:

…the fish is cured in salt in what’s called a “pound” – a square bin where you let the fish soak in salt for about 21 days. If you want a less salty version called “shore fish,” you lightly sprinkle the fish with salt and let it cure for only a couple days.

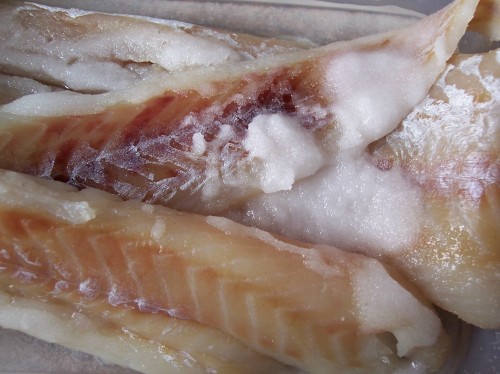
I would certainly not re-freeze fish salted by this method as I am not sure enough that this can be done safely.   If salting fresh fish, rather than frozen, it could be frozen once salted.  Below is my version of salted fish.  My picture was taken 24hrs after salting.  In the end I consider this a simple way of lightly salting fish, providing the process takes place two days ahead of the date the fish is required.   It is a method I would be happy to use again, especially as I prefer the milder flavour, but I will probably also continue to buy the blocks of salted fish as they are so convenient.  Other useful links are this overview of  Salt fish giving a helpful list of types and names around the world, this article at ehow with a similar method to that given by Rick Stein and this enlightening Ezine Article.  I would be interested to hear from any readers who have successfully tried salting fish at home by the Rick Stein method, or similar.

If you have not smelled salt fish then you would be advised to do so before you make your own to give a guideline.  Salt fish has a different, much stronger, aroma from fresh fish but if really unpleasant then discard the fish and do not take the risk. Often purchased salt fish smells particularly strong but we have never suffered ill effects.   

'Meanderings through my Cookbook' http://www.hopeeternalcookbook.wordpress.com

Salted Fish

Fillets of White Fish (Cod, Haddock, Pollack, Coley or similar)
Salt (Type not specified in the original – I used Rock Salt)
A large plastic container big enough to hold the fish without overlapping

1.  If using frozen fish then it should be thoroughly defrosted before salting and should not be re-frozen.

2.  Pat the fish fillets dry with kitchen paper and put them in the plastic container in a single layer without overlapping.

3.  Completely cover the fish with a thick layer of salt.

4.  Put a cover on the container and refrigerate for 24hours.

5.  After 24hours most of the salt will have turned to brine with the water drawn out of the fish.

6.  This fish will now be sufficiently preserved to keep for up to a week in the refrigerator.  The recipe does not say what to do with the brine but I poured away the excess liquid, leaving the patches of undissolved salt to continue the process.

—–

To prepare salt fish for cooking it should be soaked in plenty of cold water.  If it is lightly salted this will take just an hour or two but fish that is more dried out should be soaked for up to 24hours. I usually give it a second quick rinse in cold water before use.

Read Full Post »

I was reminded today that this coming weekend it is just eight weeks until we go on holiday.  We are off to France again, but will also spend time in Spain, hence this month’s Spanish style theme.  Apart from a few days in Barcelona as a special birthday gift some years ago, I have only made day trips across the border into Spain from France.  One vivid memory I have from my first day trip into Spain on a family holiday in the 1970’s were the huge piles of melons by the roadside.  In particular I remember the golden Rugby ball shaped Honeydews and enormous green and cream striped Watermelons.  I also remember that we ate melon every day for most of the rest of the holiday!  When watermelons start to appear on our local market it really feels as if summer has arrived, so as a foretaste of our travels it seemed appropriate to start with this simply made drink.

One of my favourite ways of enjoying watermelon is as a drink, usually the thick mostly seed free but unstrained version for breakfast or as an everyday liquid dessert.  Strained it can be served as an alcohol free drink on a hot afternoon in the garden or at a dinner party.  I cannot remember where I got the idea of adding the mint, with which I am usually generous, but it makes a really refreshing addition.  The finished drink is an attractive rosy pink colour, flecked with green.  I was not surprised to find other recipes for melon based drinks including one in the July/August 2010 edition the free Tesco instore magazine.  The recipe below is my own method but I have added the helpful information from the Tesco magazine as well.  A melon will last for several days in the fridge once it is cut: I usually juice either a half or a whole melon at one go, depending on size and number of drinkers.  In a lidded jug container it will keep in the fridge for 2-3 days although the flavour does begin to deteriorate after the first day.  I have seen suggestions for drinks using other types of melon too: honeydew, Charentais or Cantaloupe with either strawberries or with ginger ale also sound delicious.  (A slice of melon topped with chopped preserved ginger and a little ginger syrup is an easy and popular dessert in our house.)  See recipe for further serving information.

'Meanderings through my Cookbook' http://www.hopeeternalcookbook.wordpress.com

Minted Melonade
(This recipe is a rough guide as it depends on melon size but a large melon will provide drinks for 6-8 people, maybe more especially if diluted)

1 large watermelon
4 stems mint, more for a stronger taste – some recipes say 8 leaves, which is hardly enough
To serve
Ice (optional)
Small sprigs of mint to garnish
Ginger ale, Lemonade, Sparkling water or Sparkling wine (optional)
   or
Gin (optional)

1.  Wash the surface of the melon well, place on a large plate which will collect the juices as it is cut.  Depending on the quantity of juice needed cut the melon in half.  (If only using half a melon the remainder should be stored cut edge downwards on a plate in the fridge, but the remainder should be used up in around 3 days.)

2.  As they collect, pour the juices from the plate into the liquidiser.  Using a spoon scoop out spoonfuls of melon (alternatively cut the half into wedges and remove chunks with a knife).  Place separately in a bowl, discarding the large black seeds.  There may be small whitish seeds as well but as they are softer they usually disappear when liquidised.  These can be discarded as well if wished.

3.  Thoroughly liquidise the melon in several batches, including a little mint with each.  Pour the thick liquid into a large jug or fridge storage container.

4.  Taste the melonade and adjust the mint flavour by returning a cupful of liquid to the liquidiser with extra mint.  Thoroughly mix into the whole batch of melonade to make sure the mint is evenly distributed.  The melon is usually sweet so no additional sweetener should be necessary.

5.  For a lighter thinner drink the liquidised melonade should be poured through a sieve.  (It may be possible to use the remaining pulp to make minted melon sorbet, but I have not tried it – I will update this post if I do!)

6.  Serve chilled in tall glasses or poured over ice.  Garnish with a small sprig of mint.

7.  Alternatively serve Minted Melonade as a mixer.  I researched a little further and I discovered several recipes where melon juice (with or without the mint) is served with gin.  Tesco has a recipe for Watermelon Cooler, a version of the drink served with ginger ale, a squeeze of lemon or lime and an optional measure of gin.  The July/August 2010 issue of the free instore Tesco magazine has a recipe for Melonade with mint where the basic juice is topped up with the sparkling Italian white wine Prosecco, one of my favourite sparkling tipples with a squeeze of lime juice to give ‘extra tang’.

8.  The juice can also be simply diluted with ginger ale, lemonade, or sparkling water but take care not to dilute too much as the delicate flavour could quickly be lost.

Read Full Post »

The inspiration for this colourful recipe was provided some years ago by a contestant on the BBC programme Masterchef.  The contestant did not win: actually I think that he or she may not have progressed to the next round of the competition, however we all thought the dish produced was a winner.  I cooked it the very next day and it was delicious – and then forgot about it.  Why I did not write anything down I don’t know!  Several months later we remembered it again, but not the exact ingredients, so this recipe is a guess – and I think I have remembered fairly well, though have possibly added some ingredients not in the original.  Anyway, irrespective of how true it was, we are happy with the result.

If anyone has any information on the original Masterchef recipe or chef I would love to know – I think it was the 2008 competition initial heats. The combination of white fish, butter beans and pepper is really well complemented by the chorizo.  A little smoked or unsmoked bacon could be added as well for extra flavour.  As an alternative, the fish can be cut into pieces and mixed in with the vegetable mixture and either transferred to the oven as below or finished on the stove top. The chorizo and peppers give this dish a Spanish flavour and in the Basque country bakaiļao (bacalao – Spanish) or Salt Cod is often used, although I have not used it myself.  Salted cod should be soaked for at least 2 hours before draining and using and the dish may need little or no added salt.  See also my post on making Salt Fish at home.

100_4860 Fish w chorizo, b beans & peppers

'Meanderings through my Cookbook' http://www.hopeeternalcookbook.wordpress.com

White Fish with Chorizo, Butter Beans & Red Pepper
(Serves 4)

1 tbsp olive oil
1 large white onion, diced
100g/4ozs bacon (smoked or unsmoked – personal preference)
50g/2ozs chorizo, diced
1 large red pepper, deseeded and chopped
400g/14oz tin of butter beans, drained and rinsed
4  tomatoes, quartered (can use tinned plum tomatoes if fresh not available)
4 pieces white fish (I used pollack, but another type can be substituted)
Zest and juice of ½ lemon
A little more olive oil to drizzle
Salt & black pepper
Chopped parsley to serve

1.  Preheat the oven to 190°C/375°F/Gas 5.

2.  Gently fry the diced onion and bacon together in the olive oil until the onion is transparent.  Add the diced chorizo, chopped red pepper, butter beans and tomatoes and cook for a further 2-3 minutes.  Season to taste.

3.  Tip the vegetable mixture into a large shallow dish and place the pieces of fish on top in a single layer.  Add the lemon juice with a drizzle of olive oil and scatter over  the zest.

4.  Cover with a lid or foil and bake for 30 minutes, or until the fish is cooked through, uncovering the dish for the final 5 minutes of cooking time.

6.  Serve the fish on top of the mixed vegetables, sprinkled with a little reserved lemon zest, chopped parsley and accompanied with a side salad and crusty bread.

Read Full Post »

Last year on holiday in the French Basque country the Spanish influence was clearly visible on the menus and in the supermarkets.  One of these was the Tortilla, sometimes called a Spanish Omelette – a Spanish word being used just over the border.  In Italy the word used for this type of dish is Frittata.  The French word is, of course, Omelette, which is the English word too: usually a very plain dish, but not an easy one to perfect and made with a few added herbs – very different from the rather substantial Tortilla.  In its simplest form, the Tortilla is a potato and onion filled omelette, sometimes including bacon or ham.  In a French supermarkets we found a pre-cooked Tortilla which just needed reheating in a frying pan.  We tried one out of interest and it wasn’t too bad, but not a patch on the home cooked version.  Tortilla is so simple to make and the basic ingredients (eggs, onion, potato plus, if you wish, meat, tomato, or a green vegetable) are usually readily available in the kitchen. It is a good way to use up leftover meat, especially ham, bacon, poultry or sausages – I have made Spanish style omelette on many occasions without a recipe.  Tortilla is an inexpensive and substantial quick and easy meal, whether for a family supper or eaten with friends at lunchtime and can be served hot or cold, although I have to say I much prefer the hot version. 

Nevertheless, this time I decided to look for a basic recipe with correct quantities as I wanted to post the Tortilla here.  I found a good recipe in one of my favourite cookery compendiums, Leith’s Cookery Bible: Completely Revised & Updated Edition – Prue Leith & Caroline Waldegrave.  My adaptation of the basic recipe is given below with the added ingredients separately shown, but next time I might choose different ones.  One good addition would be chorizo, a spicy Spanish sausage, which would help add a little Spanish authenticity to the dish.  I found that having a very low heat under the tortilla from when the eggs are added helps to keep the underneath from burning before everything is properly set, plus the finished Tortilla is much easier to remove from the pan. 

Variation – see further down: 
Minted Smoked Salmon & Fennel 
100_4194 Tortilla with bacon, mushroom & spinach

'Meanderings through my Cookbook' http://www.hopeeternalcookbook.wordpress.com

Tortilla Omelette – with Bacon, Mushroom & Spinach
(Serves 4) 

Basic recipe
Knob of butter and 1tbsp olive oil for frying
45og/1lb potatoes, peeled, sliced and par-boiled until just cooked
1 small onion thinly sliced
Salt & Pepper
4 eggs, beaten
5fl ozs/¼pint/140ml single cream (Elmlea low fat is ideal) – optional 

Additional ingredients for this version
100g/4ozs bacon pieces, chopped
50g/2ozs button mushrooms, quartered or sliced if large
50g/2ozs chopped spinach, well washed and drained
50g/2ozs grated cheese, Spanish Manchego or Mozzarella if available, or Cheddar 

1.  Heat the butter and oil in a frying pan and very gently fry the  onion until soft.  

2.  After about 5minutes stir in the cooked potato and season with salt and pepper.  If you are adding extra ingredients you can add them now, apart from spinach and others which need very little cooking. 

3.  Leaving just a thin film in the pan, pour any excess oil into the beaten egg.   

4.  Quickly stir the spinach, if using, into the pan at this point and then pour in the egg mixture.  Beat the egg well, mix with the cream if using and then pour back into the pan over the potatoes and onions.  

5.  Cook over a very gentle heat, stirring a little to work the egg through the mixture so it can set evenly.    

6.  Be careful that the underside does not burn and when it is golden gently ease the Tortilla away from the pan.  

7.  You can either turn the Tortilla by inverting the pan onto a plate, inverting onto a second plate and then gently returning to the pan or instead of inverting you can finish cooking the top under a medium grill.  If you want a cheesy top then scatter over the grated cheese before grilling until it bubbles 

8.  Serve in wedges with a salad, either hot or cold.  This could also be cut into small pieces and served as part of a buffet. 

Vegetarian Variation: 
It goes without saying that Tortilla in its simplest form with just egg, onion and potato is vegetarian, but the addition of other non-meat ingredients is popular.  Mushrooms and/or chopped fresh tomato is delicious as is a cheesy topping. 

'Meanderings through my Cookbook' http://www.hopeeternalcookbook.wordpress.com

Minted Smoked Salmon & Fennel Tortilla Omelette

Basic recipe as above,  including potato
   plus
Red onion in place of white (optional)
1 small packet of smoked salmon offcuts
1 small fennel bulb, finely diced
2-3 tbsp fresh mint, chopped

Fry fennel with onion in butter/oil mixture.  Par boil potatoes, preferably new ones, with sprigs of mint.  Cook gently for about 10 minutes with partly cooked onion and fennel to allow flavours to be absorbed.  Combine with the salmon, cut into large pieces, pour in the egg mixture and cook, as above.  Serve with salad or peas.

Read Full Post »

The family felt that this had an ‘All day breakfast’ feel to it and it certainly would not be out of place as a ‘brunch’ meal as well as being a tasty and not to heavy main meal.  It was listed in the book as a substantial snack, but I served it as a light supper dish on a hot day.  I did not want to add chips, perhaps the natural choice,  so we had boiled minted new potatoes which I would recommend or you could add crusty bread if you wish.   The original recipe used cayenne pepper but I used smoked paprika – it seemed the right choice to go with a Spanish themed recipe – and dusted a little over the finished dish with some additional parsley.  I also used a larger amount of sweetcorn, by mistake –  I had added a whole tin before I realised the quantity was wrong.  I have given the larger quantity as we liked it!  If you want less corn then add half a tin.  The remainder will freeze well for another occasion. I also feel that the combination of ingredients would be the basis for a good Spanish Omelette. You could make most of this in advance adding the eggs when needed as the whole dish will reheat in the oven.  As an alternative the bacon could be replaced with sausages, either ‘frankfurter’ type or pre-cooked traditional chipolatas, cut into small pieces and spicy Spanish Chorizo sausage would be a good addition, especially with the smoked paprika.  Vegetarian sausages are readily available.

The original recipe for Eggs Flamenco comes from Salads & Snacks by Carol Bowen, first published in 1981 by Sundial publications as part of a extensive series of paperbacks available from Marks & Spencer.  A second and similar version of the recipe , called Pan-fried Ham & Vegetables with Eggs, is found in  The Spanish Kitchen by Pepita Aris.  The main difference is the addition of 115g/4ozs grated cheese (Cheddar is suggested but Spanish Manchego would be much better).   This is sprinkled over the top of the dish after the eggs, melting whilst they cook, or alternatively added and flash grilled once the dish has been removed from the oven.

100_4646 Flamenco Eggs

'Meanderings through my Cookbook' http://www.hopeeternalcookbook.wordpress.com

Eggs Flamenco
Huevas ala Flamenca
(Serves 4)

1tbsp olive oil
1 large onion, peeled and thinly sliced
1 clove garlic, crushed
250g/8ozs lean bacon or ham, diced
60g/1oz chorizo, chopped or in small slices (optional – can be increased)
2 red peppers, cored, de-seeded & sliced (or 1 red & 1 other colour)
375g/12ozs halved cherry tomatoes or 6-8 medium, cut into 8 or sliced
4ozs/125g button mushrooms, sliced
Salt & fresh ground black pepper to taste
Pinch of Cayenne pepper or Smoked paprika
1tbsp freshly chopped parsley (plus a little more to garnish)
1 x 325g/12oz tin sweetcorn, drained – use less if you prefer
A little more smoked paprika & parsley to garnish
4 large eggs (ie, 1 per portion) – use ducks eggs if available
4ozs/115g grated Manchego or Cheddar cheese (optional)

1.  Pre-heat oven to 180oC/350oF/Gas 4

2.  Heat the oil in a frying pan and cook the onion and garlic gently until soft, about 5 minutes.

3.  Add the bacon, chorizo and red peppers.  Fry for 10-12 minutes, or until the peppers are soft.

4.  Add the tomatoes, mushrooms, salt, pepper, cayenne or smoked paprika and parsley.  Continue cooking for about 5 more minutes until the tomatoes go very soft.

5.  Stir  in the drained sweetcorn and remove from the heat.

6.  Pour the mixture into a heavy based ovenproof  dish.  Make evenly spaced depressions in the mixture with the back of a spoon and into each break one egg per person.  If using, add the cheese now so it can bubble and brown while the eggs cook, or it can be added at stage 8.

7.  Place in the centre of the pre-heated oven and bake for 15-20 minutes or until the eggs have set and the yolks are as you like them – do not cook for too long if you prefer your yolk to be soft and runny.

8.  If using cheese and it has not been used already, add it now and place under a preheated grill for no more than 5 minutes until bubbling.  Just before serving sprinkle with the remaining chopped fresh parsley and a dusting of smoked paprika.

9.  Serve hot with crusty French bread or boiled new potatoes or chips plus a simple green salad.

Vegetarian Variation:

This is easily adapted as it would be no problem to cook a meat free version, possibly using vegetarian sausages though it would be good without any meat substitute.

Read Full Post »

I usually do not like the combination of meat and fruit together, but I broke my own rule for this as it didn’t seem as if it would be too sweet. I was proved right.  The recipe was very simple to cook and absolutely delicious.  The chicken was beautifully tender in a buttery orangey sauce with the hint of mint giving an unusual twist. It would be a perfect summer entertaining dish, provided you did not want to make it ahead of time.  If you are not over generous on the butter for the sauce it will not be too high in calories, although you do need to use a reasonable amount as the flavour would not be the same without it. The original recipe specified ‘two large knobs’ of butter, so I guess it is up to the cook to decide just how much that is!  Do remember to zest the orange (you may need two) before squeezing.  If you warm the fruit slightly before squeezing it will yield more juice – I always use a microwave oven to do this.  If you do not have fresh mint then wait until you can get some.  The recipe just would not be the same with dried mint.  The addition of the olive oil helps to stop the butter from burning – this and the orange zest are additions I have made to the original recipe.

This recipe was first published by food writer Keith Floyd in his book Floyd on Spain, which accompanied the television series of the same name.

100_4262  Chicken with orange and mint

'Meanderings through my Cookbook' http://www.hopeeternalcookbook.wordpress.com

Chicken with Orange & Mint
(Pollo con Naranja y Mento)
(Serves 4)

4 skinned boneless chicken breasts (4-6ozs/125-175g each)
Salt & black pepper
2 knobs butter (I used about 1oz/125g in all)
1tbsp olive oil
zest of 1 orange
150ml/5fl ozs freshly squeezed orange juice
2tbsp chopped fresh mint
Sprigs of mint & orange slices or some reserved zest for garnish

1.  Rub the chicken breasts with the salt and pepper to season them.

2.  Melt about half of the butter in a frying pan with the olive oil and gently saute the chicken pieces for 4-5minutes, turning once, until they are light gold.

3.  Pour in the orange zest and juice and when it is simmering cover and cook for about 8-10minutes.  When almost cooked stir in the chopped mint.  At the same time add the remaining butter which will enrich and help thicken the sauce.  Be careful that the chicken does not overcook.  It can quickly change from soft and moist to being dried out.

4.  Serve with saute potatoes, or simple boiled minted new potatoes and a green vegetable or salad.

Read Full Post »

Older Posts »